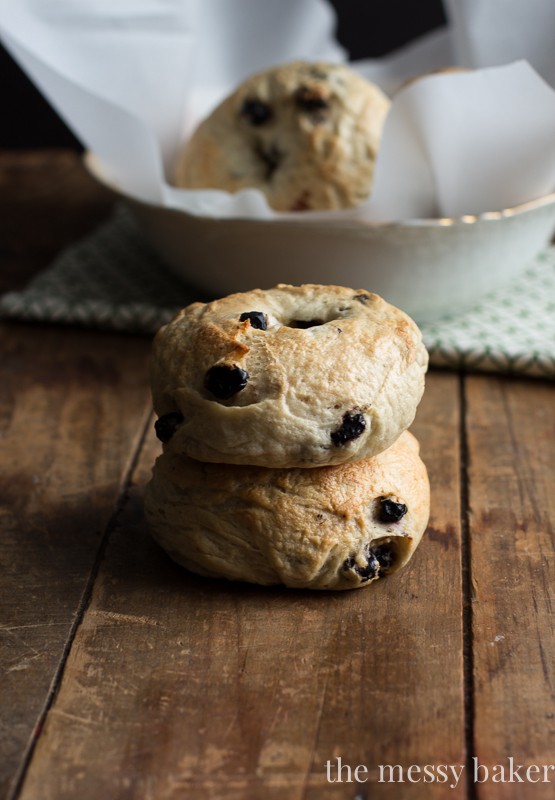
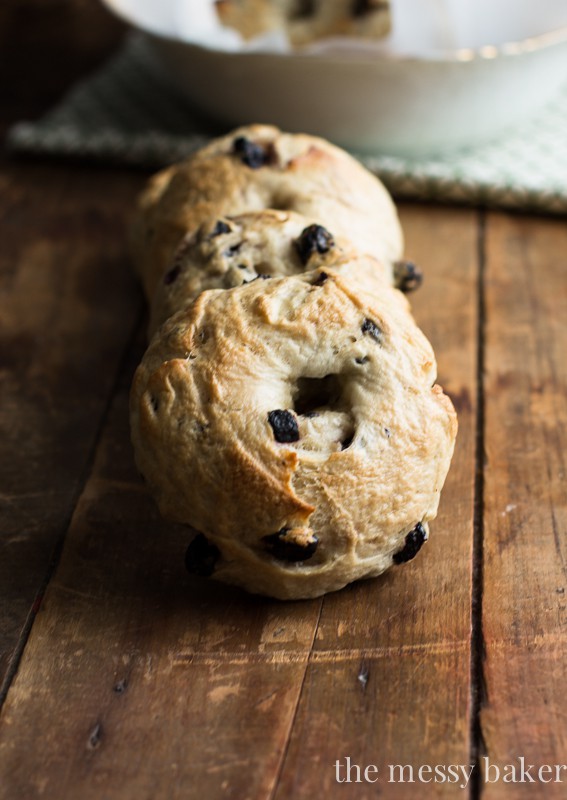
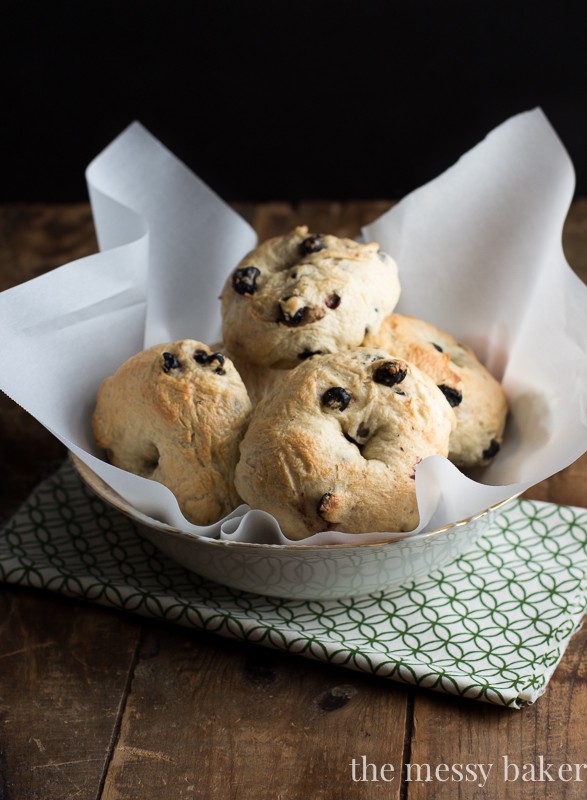
Blueberry Bagels {A Tutorial}
Chewy bagels loaded with juicy blueberries.
I’ve had bagels on my imaginary baking bucket list for quite some time now. I say imaginary, because it doesn’t actually exist; well, at least not on paper. My bucket list exists only in my head, long and wavering.
With all of the creative talent on the Interwebs, it’s hard to keep a concrete list of recipes on my list.
I lack the necessary authoritative characteristics a bucket list demands. In other words, I have a short attention span. What looks good today is sure to change ten times by tomorrow. I have an ongoing list of recipes; so many recipes, not enough time. I’d have to make eight recipes a day to even begin to make a dent in the scroll that is my bucket list.

One recipe at a time, right?
I was finally able to cross one of the items off of my lengthy list: homemade bagels. If I had known how painless and methodical the process was, I probably would have crossed them off of the list earlier.
In total, the process takes 2 hours. Granted, a majority of that time is dedicated to rising and proofing the dough. They’re a bit step heavy but not at all complicated.
I made this dough twice. The first attempt was made with fresh blueberries. What a mess! I have no idea what I was thinking. Okay, I know exactly what I was thinking. Fresh is better. In this case, fresh made a sticky mess.
The second attempt was made using dried blueberries. I didn’t have high expectations, but, in the end, I was pleasantly surprised. The dried blueberries reconstituted during the rising and baking process, plumping and becoming juicy. Since dried blueberries have a higher concentration of blueberry flavor, they were the perfect choice–even if they were my second choice.
Let’s talk flour. Specifically, bread flour vs. all-purpose flour.
I’m a loyal all-purpose flour baker. My thoughts were, “What can bread flour do that all-purpose flour can’t handle?” Boy, was I naive.
As a blogger, I have a ton of crap. It’s necessary crap, but it’s crap non the less, and crap adds up. The last thing I wanted to do was purchase yet another bag of flour. Where does one store a fourth bag of flour in a full kitchen? So, I went ahead and made the bagels with all-purpose flour.
Bad decision!
My bagels were tough and dense, not at all chewy and supple on the inside. One good throw to the head, and they would knock someone unconscious. In the trash they went.
I learned a valid lesson: one more bag of flour won’t hurt.
The second batch of bagels using the stubbornly purchased bag of bread flour earned its keep in my baking cabinet. I shoved a few other things out of the way and squeezed the bag into its new place on the shelf. Problem solved?
Why choose bread flour? What’s the difference? Really, is it worth the money? I’m glad you asked.
Bread flour has a higher percentage of protein, usually ranging from 12-14 percent depending on the brand, and is usually used in recipes that call for yeast. The higher gluten content assists in the rising process. Breads made with bread flour yield a smoother, more elastic dough, which aids in the overall structure and shape of the dough. Bread flour is off white in color and a bit coarser than all-purpose flour.
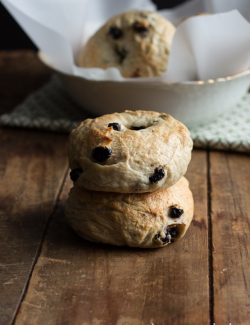
My first batch of bagels were lumpy and hard to shape. The batch made with the bread flour proved easier to shape and turned out smooth and symmetrical in shape. Their exterior was chewier than the first batch and their interior was softer and lighter, not at all dense like the first batch.
Let’s discuss the bagel making process:

A portion of the flour, yeast, dried blueberries, and salt get mixed with the paddle attachment in the bowl of your stand mixer.
I used Red Star Platinum Yeast for this recipe. For an impatient bread maker like myself, Red Star expedites the rising process.
Honey and hot water are whisked together in a measuring cup then added to the flour mixture. Beat the dough until it just starts to come together.
Swap the paddle attachment for the dough hook. Add the remaining flour and mix on the lowest speed for 8 minutes. You’ll know the dough is ready when its smooth and elastic.

Transfer the dough to a lightly floured surface and shape into a smooth ball. Place the dough in a lightly oiled bowl; cover with a dish towel and place the bowl in a warm, undisturbed, area of your kitchen. Allow the dough to rise until its double in size, about 1 hour.

Shape the dough into a log. Using a pastry scraper or floured knife, cut the log into 8 even pieces.
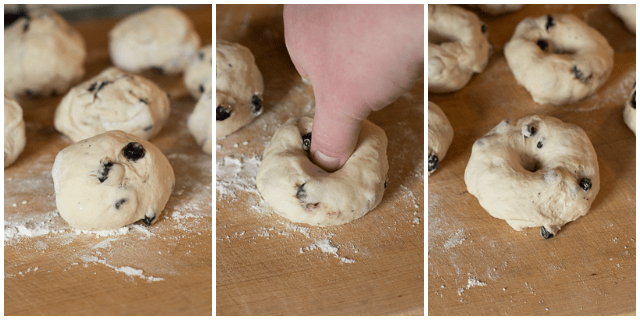
Gently roll the dough into balls. Place your thumb (thumb courtesy of Squirrel) in the center of each ball and push down to create a hole. Gently tug on the dough to create a larger whole. Cover the dough with a dry towel and allow to proof (rest) for 15 minutes.
While the dough is resting, heat 8 cups of water to a gentle boil. Preheat the oven to 400 degrees F. and cover a baking sheet with parchment.
Boil the bagels for 40 seconds on each side. Remove from the water with a slotted spoon and onto your prepared baking sheet. Sprinkle each bagel with a generous pinch of sugar and bake for 25-30 minutes, or until the tops of the bagels are golden brown.

Store the cooled bagels in an airtight container or bag for up to 7 days. Or, freeze the bagels in a single layer for up to 3 months.
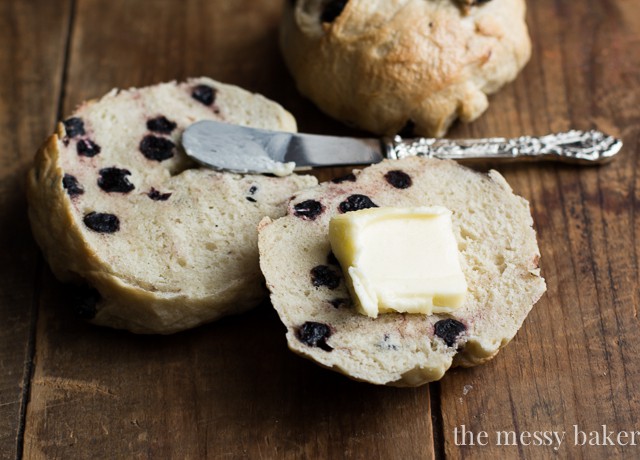
Toast the bagels and slather with butter before serving.
Honey Wheat Blueberry Bagels
Soft, chewy bagels bursting with juicy blueberries.
Ingredients:
- 3 and 1/2 cups bread flour, divided
- 1 and 1/2 teaspoons kosher salt
- 1 and 1/4 cups dried blueberries
- 1 and 1/2 cups hot water (not to exceed 120 degrees F.)
- 3 tablespoons honey
- 1 packet Red Star Platinum yeast
Directions:
- In a stand mixer attached with the paddle attachment, mix 2 1/2 cups flour, salt, and dried blueberries until combined.
- Whisk hot water and honey together in a measuring cup. Add the yeast and gently whisk to combine. Set aside for 5-10 minutes to allow the yeast to bloom.
- Slowly add the water mixture to the flour mixture. Beat until the dough just comes together. Scrap down the sides of the bowl and give the mixture one more good mix.Swap the paddle attachment for the dough hook. Add remaining 1 cup of flour. Continue to mix on low for 8 minutes.
- Transfer the dough to a lightly floured surface and shape into a smooth ball. Place the dough in a lightly oiled bowl. Cover with a clean, dry kitchen towel and place the bowl in a warm, undisturbed area of your kitchen. Allow the dough to rise until its double in size, about 1-2 hours.
- Transfer the dough to a lightly floured surface and shape the dough into a log. Using a pastry scraper or floured knife, cut the log into 8 even pieces.
- Gently roll the dough into balls. Place your thumb in the center of each ball and push down to create a hole. Gently tug on the dough to create a slightly larger whole. Cover the dough with a dry towel and allow to proof (rest) for 15 minutes.
- While the dough is resting, heat 8 cups of water to a gentle boil. Preheat the oven to 400 degrees F. Cover a baking sheet with parchment.
- Boil the bagels for 40 seconds on each side. Remove from the water with a slotted spoon and onto your prepared baking sheet. Sprinkle each bagel with a generous pinch of sugar and bake for 25-30 minutes, or until the tops of the bagels are golden brown.
- Store the cooled bagels in an airtight container or bag for up to 5 days. Or, freeze the bagels in a single layer for up to 3 months.
You may use active dry yeast in place of Red Star Platinum yeast for this recipe. If you decide to use active dry yeast, your dough could take up to 2 1/2 hours to rise.
41 Comments on “Blueberry Bagels {A Tutorial}”
I love this! I have a bucket list too that exists both in my head and on a pinterest board only. Bagel making had been on it for years until I finally bit the bullet and made some last year. So much easier than I thought (no idea why boiling & baking freaked me out before). And ironically, I posted another bucket list thing I finally made today…homemade milk!
I almost skipped the boiling (I’m lazy), but after some research, I found that it is quite necessary. Homemade milk? Heading over to check that out.
Hey chica, am I missing the recipe somewhere? I see some instructions, but no recipe/measurements?
Jen! Girl, have I missed you. Thank you for noticing and bringing the missing recipe to my attention. I didn’t have my coffee before I hit the “publish” button this morning.
i was one of those “why not use ap flour for everything; it’s AP FLOUR, after all!” people, and i think in a lot of cases, it works. But over the course of the last few years, i’ve realized the difference – sometimes big difference – alternate flours bring to a recipe like this one. Or like how cake flour can make cookies crazy good, or how mixing wheat and ap flour can be awesome. I get annoyed at my 4 kinds of flour in the pantry from time to time, but it does serve a purpose, for sure. great tutorial, Jennie!
I was the same way, Shannon. One more bag of flour wasn’t an option until it became necessary. I recently used bread flour in place of AP flour in my pizza dough, and the results were so much better. The crust was crunchier. Thanks!
Bagels have been on my list to make for a while now, but I was also going to try and cheat and not use bread flour. I wanted to make whole-wheat, but maybe I can do a 50/50 ratio of bread flour to whole-wheat flour….Hmmmm.. Anyhoo, these guys look like they turned out perfectly!
Nicole, I believe there’s a whole wheat bread flour on the market. I can’t swear by it, but I’m pretty sure. Yes, you could definitely do 50/50.
These look great! I too have bagels on my list of things to make. This is a great tutorial! Pinned :)
Thanks for pinning, Chelsea!
Wow! It sounds like bagels are way easier than I would have ever expected. These sound fantastic and I’d really love to give making them a try.
They really are easy, Kate. I was shocked. I’ll be making homemade bagels from now on. Thanks!
You are so so smart! Making bagels. Awesome tutorial girl :)
Thanks, Kayle! I love bread.
Jennie, these are beautiful! I love making homemade bagels, though I’ve never tried the bread flour. I’m okay with kitchen crap lol! ;) Goodness knows I have enough of it already. Thanks for the step by step! The inner bagel maker in me is feeling inspired!
I loooooove fresh bagels, and I’ve always wanted to try making them, but not having bread flour always stopped me. (Also, you can kind of get them on every corner in NJ, lol) But I think I’m going to have to bite the bullet and buy a bag because these are so puuuurty!
I have not yet had blueberry bagels but I love this idea! I wonder if they’d work with Caedmon ? X
Blueberry bagels are my absolute favorite kind. Ever. Your homemade bagels look so delicious! And surprisingly easy.
Pinning!
I have been wanting to make bagels for a while too, but I haven’t gotten up the nerve. Thanks for all the great tips!
Yes yes yes to bagels! Love this tutorial. And I’ve been there, done that with bread flour — it’s amazing the difference it makes in some baked goods! Definitely worth shoving it somewhere in the cupboards. ;)
Great tutorial! I was so worried about making bagels but I was so happy that it wasn’t that much harder than baking bread from scratch. I have a bucket list too! On it, homemade croissants… anybody that wants to help me is more than welcome!!!
Girl, you crack me up! But, yes…one more bag of flour won’t hurt. (If you could only see how many bags of flour I have at any given time. It’s insane with the gluten free and grain free baking in addition to conventional baking, I tell ya.) Beautiful bagels! Yes, to the dried blueberries. It’s amazing how they become moist in yeast breads like craisins and raisins. I’m loving your photography lately! Thanks for sharing. Pinning (of course)!
These look so delicious! I never realized how easy it was to make bagles
I love the tutorials you’ve been doing lately. These bagels look perfect!
These bagels look ridiculously delicious, great job my friend :D
Lovely spots of blueberry!
Cheers
Choc Chip Uru
I finally checked bagels off my bucket list a couple years ago. I think I need to try blueberry next…yours look terrific!
I heart bagels. Yours look absolutely perfect. After your informative post, I feel armed and ready to tackle any bagel making situation! I would have thought fresh blueberries would be better too…who knew?! Pinned!!!
I am totally envious of your bagel making skills! Mine never look this perfect – or this good!
These look fantastic! I’ve actually never made homemade bagels before either, but you are inspiring me to give them a try! Blueberry is one of my favorite flavors, along with everything bagels–I might need to try both!
Homemade bagels are on my bucket list, someday! Yours look so yummy!
These bagels look fantastic! Will you send me some? I love dried blueberries and bet they really pack in the flavor in these. Your pretty nail polish matches the blueberries :). I have a written bucket list of big life things but not baking. It’s not as important to me
Haha. Aww. I love that you tried this with fresh blueberries first. That is totally something I’d do.
And fun fact. I have at least 19 different types of flour. I just counted. Craaazy.
And these bagels look perfect!
I’m the same way with flour – I have a giant bag from Costco so everything by default has to be all-purpose or else I don’t make it – didn’t realize bagels were so different. But they look damn good!
Thanks for posting the recipe.
I totally feel your bucket list pain. I feel like everytime I make one thing, 10 more ideas pop in my head (Pinterest is fantastic for feeding this bucket list anxiety, haha).
I can’t believe you made bagels. They look so beautiful! My friend’s family owns a bagel shop here in NY and I keep telling him that I want to learn.. but the whole waking up at like 3am is a big deterrent haha
Omg these look perfect! A dozen please :)
Mmm, blueberry bagels sound so good right now! These look amazing!! Great job on the tutorial
Jennie, a big hells yes to everything in this post. Like you, I have a bazillion things on the bucket list in my head. I need to start writing down all the recipes I want to make because, like you, that bucket list changes every day when I see all the beautiful new things on everyone’s blogs. Plus I have a ginormous stack of recipes printed out just sitting in my office, staring at me. There aren’t enough hours in the day for all this baking! I’m so glad you finally bought a bag of bread flour. Girl, I have SO many bins of different flours (cake, whole wheat, all purpose, white bread, whole wheat bread). But I’m glad I do because I can literally whip up anything (except gluten free. Sigh. That would add like, five more bags to the collection!). I love all the photos and tips in this post. Thanks for trying all the different things first (AP flour, fresh blueberries…) and giving us the 411. Pinning for sure, because home made bagels is on my bucket list! And your nail polish is adorbs!
I came here in search of a blueberry bagel recipe, but stayed to comment about flour.
Bread flour is very high in gluten and AP flour has less gluten. Canadian flour is among the best in the world as it has a lot of gluten in it, even the AP flour.
The reason your first attempt at bagels failed was not the only the AP flour. It looks like they were undermixed and not let rise enough on the first rise.
I promise that you can make good bagels with AP flour. If there is a next time. Knead until you can stretch your dough into a thin piece that you can see through (called the Windowpane taste), and let it get a good long first rise, doubled and when you poke it the dimple stays in your dough.
You wrote yeast in the directions twice, in the first direction and the second. You may want to take that out, as it caused a mistake when I made the recipe. Hopefully it’ll turn out okay, but I thought you should know to help others in the future.
At Crossway Consulting, we specialize in Digital Marketing strategies that drive growth and maximize online visibility. Our services include SEO optimization, high-quality backlink building, and content marketing to improve search rankings and attract organic traffic. We create tailored solutions to help businesses stand out in a competitive digital landscape. Partner with us to enhance your online presence and achieve lasting success!