Mile-High Buttermilk Biscuits {A Tutorial}
Mile-Hgh buttermilk biscuits, a tutorial.
Today I’m going to teach you how to make tall, fluffy buttermilk biscuits. The process is similar to my scone tutorial, but varies just enough to warrant another tutorial. Since I love kitchen science and baking methods, I don’t mind yammering on about carbs.
There are biscuits, and then there are BISCUITS. If you talk to five different people, they’ll give you five different theories on how to make biscuits. Each person has their own unique method, none of which are wrong.
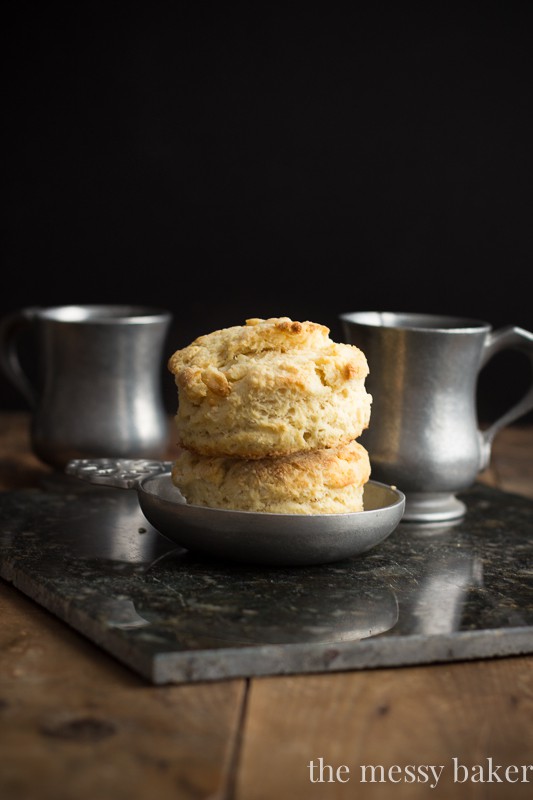
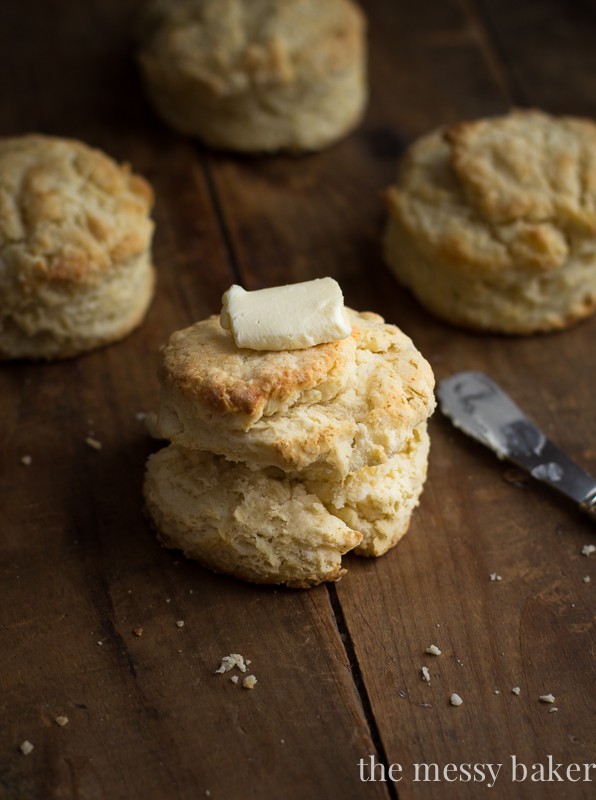
Here is my theory: If I’m going to eat a biscuit, said biscuit has to be worthy for the taking. I like my biscuits tall, at least 2-inches. A mammoth biscuit, if you will. My perfect biscuit must be buttery, tender, and airy. No, not one or the other. It has to encompass all three of those traits. There is nothing worse than a flat, dry biscuit that can be used as a hockey puck (I’m talkin’ to you, dad).
I’m going to lay some baking science on ya. Ready?
- All of your ingredients MUST be cold. Butter, eggs, buttermilk…all cold. I even go so far as to measure my flour and add it to the bowl I’ll be mixing my biscuit dough in. I then place the bowl in the freezer for 5 minutes. The cold bowl keeps your dough chilled while you’re making the biscuit dough. I prefer to use a metal bowl because it takes less time to chill in the freezer and it stays cold while you’re mixing.
- Check the dates on your baking soda and baking powder. I’ve made the mistake of not checking the date in the past and used out-of-date baking powder. You don’t want to go through all the effort of making biscuit dough and not have your biscuits rise. Check your dates.
- Mix your dry ingredients before adding your wet ingredients. I know this sounds obvious, but it’s a step that shouldn’t be skipped or taken lightly. If you don’t mix the dry ingredients before adding the wet ingredients, you’ll end up with excess pockets of baking powder or salt in one area and not enough in another. You want all of the ingredients to be well incorporated.
- Cut the butter into ½-inch cubes. Place the butter cubes in the freezer for 3 minutes to chill.
- Whisk the buttermilk and egg together in a measuring cup. Store the measuring cup in the refrigerator until you’re ready to use.
- Your hands are your best tools when making biscuits. A spoon or rubber spatula won’t do the job. So, get those hands dirty!
- DO NOT over mix the dough. Over mixing can lead to tough biscuits. You’ll want to mix the dough—using your hands—until the dough just comes together.
- Preheat your oven. Do not skip this step. If your oven isn’t fully preheated, your biscuits will not rise as high.

How do biscuits rise? I’m so glad you asked.
The combination of baking powder, steam, and high oven temperature cause the biscuits to plump and rise. Baking powder is a chemical leavening agent that creates volume when heat is introduced. As the biscuit dough heats up in the oven, the butter begins to melt, creating steam. The combination of steam and baking powder pushes the dough upward for a tall rise.
The method:
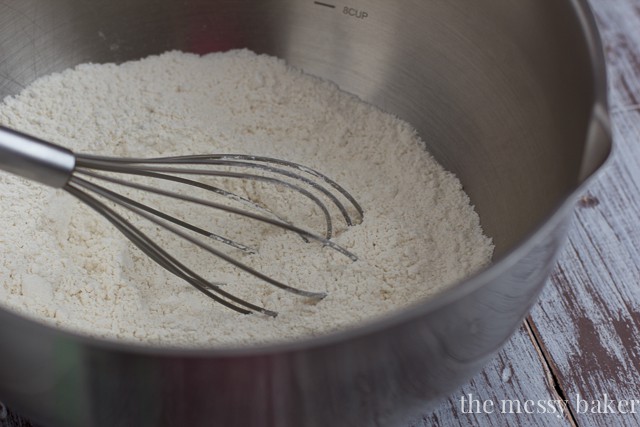
Whisk the dry ingredients together in a large bowl.

Using a pastry cutter, fork, or two knives, cut the butter into the dough.
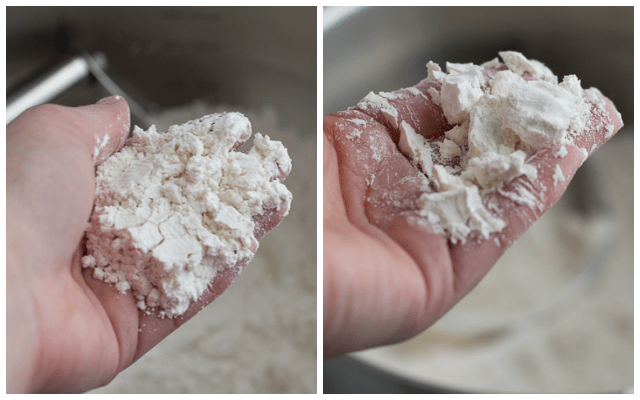
When the dough resembles coarse crumbs, the mixture is ready. A simple way to make sure the butter is equally incorporated into the dough is to pinch the dough between your fingers. If the dough sticks together, your mixture is ready.
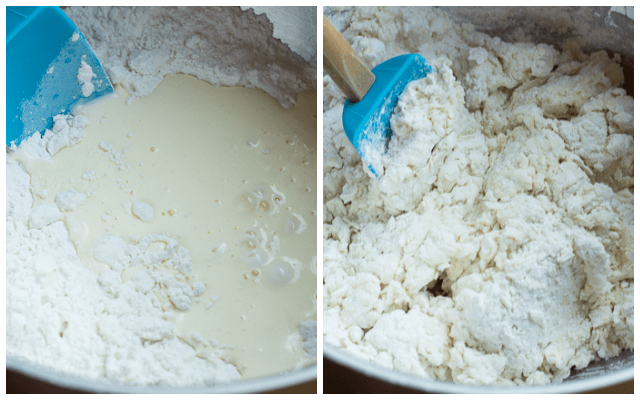
Add the wet ingredients to the butter and flour mixture. Stir until just combined.

Transfer the mixture to a lightly-floured surface. Using your hands, form the dough into a 1-inch disk.

Using a biscuit cutter or inverted drinking glass, cut the dough into rounds. Place the biscuits on a gently greased baking sheet, spacing them 4-inches apart. Bake until the tops of the biscuits are golden brown, about 20-22 minutes.


These massive biscuits have a crunchy, golden brown exterior that break through to buttery center that melts in your mouth. They’re best slathered with butter. If you really want to make these biscuits special, add a healthy smear of peach butter or strawberry-balsamic jam.

I like big biscuits and I can not lie!
These mammoth biscuits are being featured over at Food Fanatic today.
21 Comments on “Mile-High Buttermilk Biscuits {A Tutorial}”
These biscuits look GOOOOOOOD!!!!!!!! I loveeee this tutorial and how you have broken down each element!!!!! I do love a good biscuit and by that I mean exactly what you have described – Tall, airy and buttery. Love this post!
Getting a pastry cutter was one of the best things that ever happened to my biscuit making! Thanks for the step by step – they are really helpful! And what a gorgeous end result. Some honey and almond butter and I would be in heaven!
Love all the baking science in this post, and those biscuits look incredible! I especially loved the tip about freezing the bowl- I knew that cold ingredients were important but never thought of how to make sure of that!
Mm these biscuits are so high up, they would taste like heaven :D
Delicious!
Cheers
Choc Chip Uru
You’re like a beautiful, brilliant, biscuit scientist!!! They look SO GOOD Jennie!!! MOVE HERE AND MAKE ME BREKKAST! :P
These biscuits look delicious! Can you solve a mystery for me? What is the difference between a buiscuit and a scone? They appear to be the same to me… Thank-you! :)
They are so incredible! I love how tall and fluffy these things are! It’s time to me to join the mile-high biscuit club! :D
Gorgeous biscuits! These look perfect!
These biscuits look gorgeous! Love this step-by-step tutorial and all the pics – I love how tall and fluffy they turned out. Pinning :)
i am anti-hockey puck biscuits, which is why this tutorial is so great: it’s like immediate success. I agree with all your tips, b/c i’ve had to really work to master the biscuit, and those suggestions? all true. especially about mixing ingredients with your hands: i don’t do that unless it’s important, and for biscuits? totally important.
Jennie, nothing like a good homemade biscuit! Keep spreading the word — maybe we can get production halted on those refrigerated tube biscuits!
Lol, for a second I thought you were going to say “Each person has their own unique method, ALL of which are wrong”. I really need this tutorial, Jennie. I love biscuits so much but I have yet to make one that’s as mile-high as yours are. I’m going to print this out and will keep making biscuits until I reach the trifecta of buttery, tender and airy.
Must… have… these… biscuits! The last time I had biscuits, my mom had found an old box of bisquick (or something of that sort), which was waaaay past it’s expiration date for the baking powder it contained. It made a perfect batch of hockey pucks, but definitely not anything edible. I haven’t even had the desire to try making biscuits since then… but these… I think these biscuits have won my heart!
Whoa. This post must have taken forever to do! And those pictures?! Oh my. Never seen such pretty biscuits! Definitely using your tips the next time I make biscuits. And the recipe, too. :)
Pingback: 16 Homemade Biscuits That Would Make Grandma Proud
This is definitely one of the best biscuit recipes i’ve tried. But DO NOT bake the biscuits 25-30 minutes! They will turn out burnt! Luckily, since i’m familiar with biscuits i baked them for about 12 minutes and they turned out perfect. I recommend this recipe but change the baking time!
These biscuits are great! Just DO NOT bake them for 20 min! They only need 10-12 min!
This recipe makes great biscuits. We sure like them. No other recipe will replace this one at our house.?
Could you please send me the recipe for the biscuits
At Crossway Consulting, we specialize in Digital Marketing strategies that drive growth and maximize online visibility. Our services include SEO optimization, high-quality backlink building, and content marketing to improve search rankings and attract organic traffic. We create tailored solutions to help businesses stand out in a competitive digital landscape. Partner with us to enhance your online presence and achieve lasting success!
Pingback: Mile-High Buttermilk Biscuits Buttery Layers with Golden Tops